
In a recent POC, we were asked if single sign-on (SSO) could be achieved between Tableau and Snowflake using Auth0, a third-party identity provider (IDP). Additionally, the client was looking for the ability to use secured views in Snowflake to limit the data that was being accessed by a Tableau Report.
We’ll save the secured views part of the solution for a future post. Here, we will cover the process of setting up SSO for Snowflake using a custom SAML 2.0 configuration. We used Auth0 in this case, but this guide should serve for any SSO provider requiring a custom configuration. Additionally, we will walk through creating new users through the Snowflake GUI as well altering existing users to utilize the newly created SAML connection.
Setting up SSO can be a daunting task no matter which tool you use or what experience level you have. While there are several fully integrated identity management providers such as Okta and Azure Active Directory that can trim the task of SSO setup in Snowflake down to a matter of clicks, there is a downside to these tools in that they tend to be expensive and constitute a black box when it comes to troubleshooting.
Fortunately, Snowflake is flexible enough to work with any IDP that offers the ability to connect using SAML 2.0.
Setting up SAML IDP Inside of Snowflake
There are two prerequisites to get started:
- You have completed setup of the SSO account on their website.
- You are part of the ACCOUNTADMIN group of your Snowflake instance and working in that role. This is necessary because the changes applied during this process will be applied at the account level.
Now, to set up a custom SAML 2.0 connection inside of Snowflake, you will be resetting the SAML_IDENTITY_PROVIDER parameter with a command like this:
use role accountadmin;
alter account set saml_identity_provider = ‘{
“certificate”: “SecurityCertificateValueFromProvider“,
“ssoUrl” : “SingleSignOnURL“,
“type” : “Custom“,
“label” : “SSOExample“
}’;
As you can see, resetting the SAML_IDENTITY_PROVIDER requires four values: certificate, ssoUrl, type, and label.
The first value, certificate, is the security certificate. Your IDP generates this certificate and sends it to validate the connection between them and Snowflake whenever a user logs in. Below is a partial screen shot of the certificate as provided by Auth0.
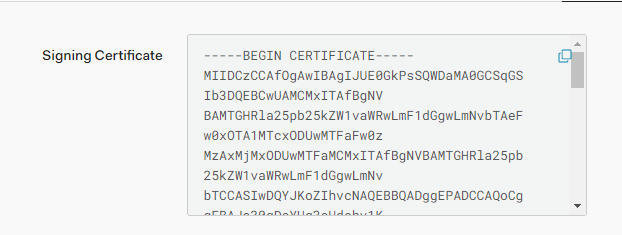
You will replace SecurityCertificateValueFromProvider in the above command with the certificate value. When you copy/paste your certificate value in, you may encounter an error caused by unseen carriage returns. To fix this, remove all the carriage returns and created a single line entry for the entire certificate value. You should be able to rerun the process without error.
Next you will need to locate the SSO URL for your provider to set the value for ssoUrl. This URL will tell Snowflake where to redirect the user when they attempt to login through the browser. Replace SingleSignOnURL with this URL.
For this sort of SSO setup, the value for type should be set to Custom as shown. If you are attempting to set up SSO either Okta or ADFS there are specific values that should be used instead.
Finally, the label field allows you the ability to customize the button text for the identity provider you are creating in the Snowflake login page. We used SSOExample here, but this label can only contain any combination of letters and numbers (no spaces). With these four pieces of information you can use the following SQL statement to create the identity provider definition inside of Snowflake.
After you create the identity provider connection it is important to test the connections ability to work, to do so use the following URLs to simulate what the users experience would be.
If your account is in US West: https://<account_name>.snowflakecomputing.com/console/login?fedpreview=true
If your account is in any other Snowflake Region: https://<account_name>.<region_id>.snowflakecomputing.com/console/login?fedpreview=true
When going to the correct URL you should see the following:
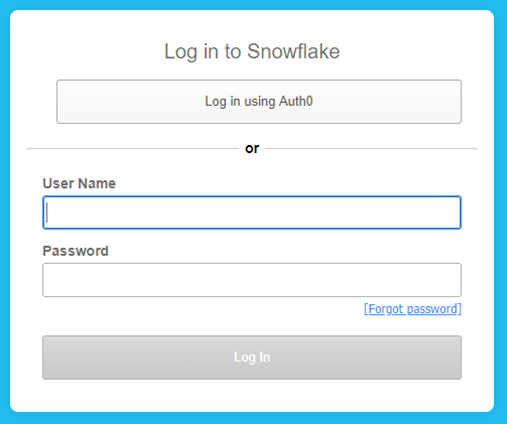
Clicking on the “Log in is using…” button should redirect you to the custom providers single sign-on page, once you enter your user name and password click Log In and you should be redirected to the Snowflake application.
If you receive an error, you will need to review the logs that are associated with the custom identity provider you are using. The logs will be able to tell you greater detail what the issue might be as Snowflake is simply acting as a pass-through mechanism for the user to log in and is awaiting a success message from the identity provider before allowing entry into the application.
Once you have finalized and confirmed the ability of you users to access Snowflake through the third-party IDP, the last step will be to enable SSO through the Snowflake login page. To do that you will need to execute the following SQL command:
use role accountadmin;
alter account set sso_login_page = true;
After doing so your login in screen will change from this:
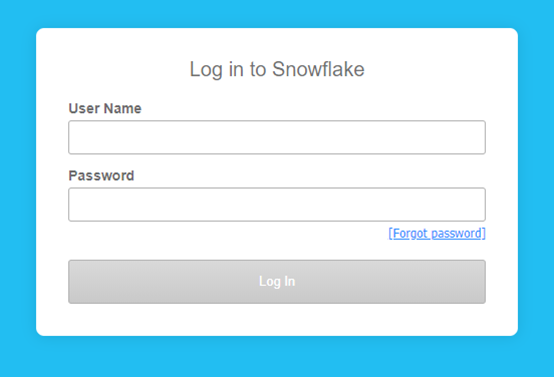
To this:

Congratulations, your users can now log in via the third-party IDP. However, you are not quite done, as there is an important clean up step to perform! Your users still are still able to use Snowflake’s built-in login process, and you will need to remove each non-administrative user’s current password to prevent this from happening. Passwords can be removed for each user by executing the following command:
alter user <name> unset password;
Creating New Snowflake Users for Single Sign-On Using the GUI
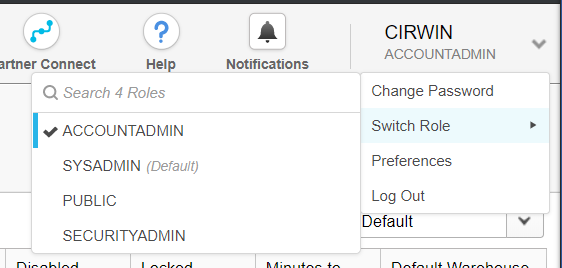
To create a user using the GUI first your user must have ACCOUNTADMIN or SECURITYADMIN access to the Snowflake instance. Next you should switch your role on the current worksheet to either ACCOUNTADMIN or SECURITYADMIN using the Switch Role menu located under your user name on the right-hand side of the screen.
After changing your role, you will then be able to see the Account section located in the navigation section. Once you locate the Account icon, select the icon.

Upon selecting the Account icon, you will be taken to the Account information screen. Depending on your security level you might get an error if you do not have access to the ACCOUNTADMIN role as the page opens directly to the Usage tab.
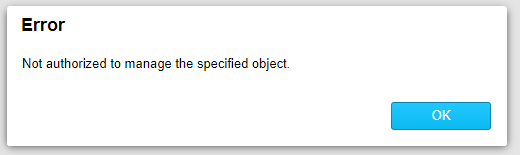
If this happens click OK and then select the Users tab.

Once you select the users tab, immediately below on the far-left hand side click on the create button.
![]()
After clicking Create, the Create User dialog box will pop up on the screen and you can start to fill out the details of the new user, starting with the General tab:
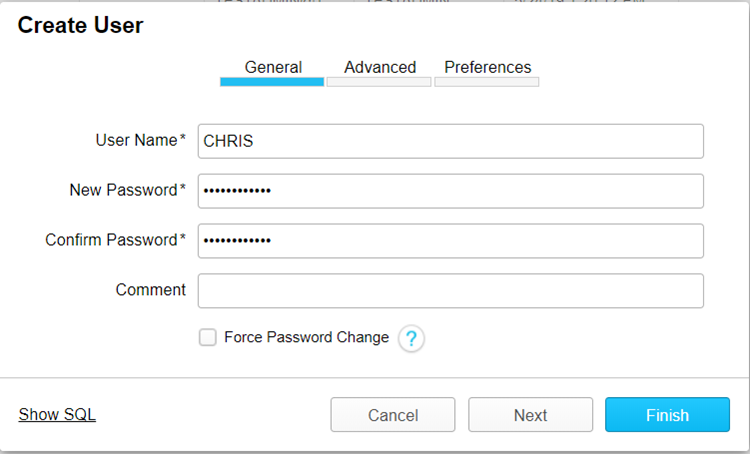
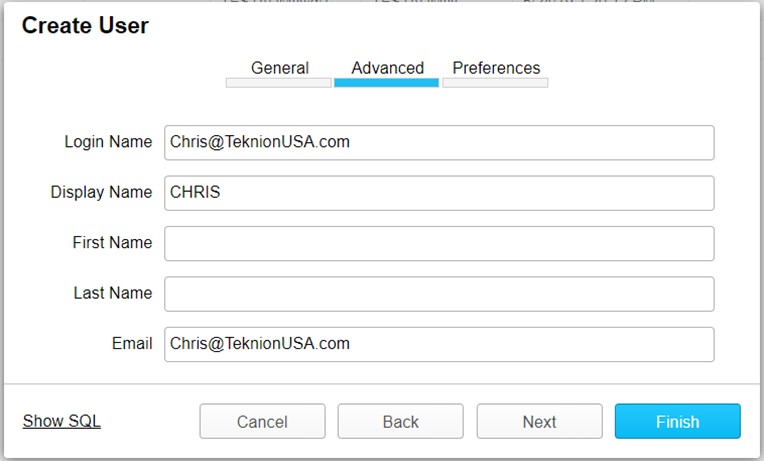
After adding the user name and password, also ensure that you uncheck the Force Password Change, without unchecking this box the application will expect the user to login with a password on their first attempt. Once completed with the General tab, click the Next button and fill out the Advanced user information on the next tab. It is important to note that the Login Name is the single key that ties the entire single sign on process together. The Login Name should be the same in your third-party identity provider as it is in all systems that you will be trying to set up SSO. We chose to use e-mail as our unique user identifier, but you may choose to use something different. Below is an example of how we set up the Advanced tab in our case:
At this point, you can choose whether you want to click Next to assign default warehouses and roles, or you can select Finish to create the user. If this user is not an administrative user, then it is recommended by Snowflake to execute the following command:
alter user <name> unset password;
As in the first example, this statement removes the ability for the user to access the Snowflake system by using Snowflake’s built-in login process.
Creating New Snowflake Users for Single Sign-On Using the SQL Commands
As stated earlier if you are looking to script out the creation process of users, here is a SQL statement that will allow users to be created:
create user <name>
login_name = <string>
display_name = <string>
email = <string>
default_warehouse = <string>
must_change_password = false;
Remember to remove both opening and closing angle brackets before executing.
Altering Current Users Login Name for Single Sign On
If you already have your Snowflake environment set up to use the default login process, then it is important to note that you will need to update all users Login Names with the matching Login Name they will use for their SSO account. To update the login_name and password values execute the following SQL Commands for each non-administrative user:
alter user <name> set login_name = <string>;
alter user <name> unset password;
Remember to remove both opening and closing angle brackets before executing.
Conclusion
With this, the first post in our series about SSO and Snowflake, we walked through how to set up a custom SAML 2.0 IDP inside of your Snowflake environment. Additionally, we walked through how to create new users in Snowflake using the GUI as well as how to create and alter current users’ attributes, so they can enjoy the newly created single sign-on experience when logging in. In our next post, we will continue our series with a step-by-step guide for setting up a custom application inside of Auth0, the third-party IDP we used in our POC. A link will be added here when that installment is published.